Voom-Aster Video Player Hacking
November 12, 2013
I needed to take a little break from the endless tracing of point-to-point wiring and replacement of sticky lumps of toxic goo for modern capacitors, so I picked up a project I’d left half-finished and spent the whole weekend engrossed in it.
This is an idea I had rattling around in my head for a while so in the summer I started looking for the parts. Primary among them was a View-Master toy, which I got from a lady who was its original owner when she was a little girl. She was slightly sad that I was going to take it apart but I promised that I’d do something worthy with it. Hopefully this is it.
The idea was to build a 3d video player into a View-Master so that optical media could be used in place of the little round View-Master reels. The disc would stick out the top and spin like hell (beware if you have bangs).
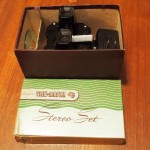
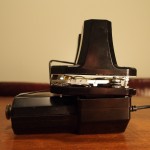
Here’s the View-Master as I got it. It’s two pieces: the View-Master itself, and an attachment that attaches to the back to add a light bulb and two D cells. The View-Master itself is really compact — but luckily the light unit adds enough space to make the project practical.


The Displays
I did some research on digital photo frame hacking as a source of cheap, small displays, and ordered a few dollars’ worth from a Chinese manufacturer, but quickly realized that this was going to be a lot of time wasted for a few dollars saved. The parts vary a lot, aren’t very high quality, and involve the kind of microsoldering that gives me a headache. (In doing this research I ran across another View-Master hack, but for me half of the joke was in the optical disc, and that one didn’t play video, so no harm in retreading the ground we do have in common.)
I ordered a couple of SSD1331 0.9″ OLED displays from Adafruit. And quickly discovered that there was no Raspberry Pi driver for it.
I’ve done very little Linux kernel hacking, and never worked with SPI, but necessity is the mother of invention. Luckily there’s Notro’s excellent FBTFT drivers, which are a collection of drivers and glue to attach a variety of small displays to Linux framebuffers. While the SSD1331 wasn’t supported, other fairly similar displays were, so this was as gentle an introduction as I could wish for.

The devil is in the details, however, and a fair amount of hair-pulling was involved to get the displays to fire up. I know more about driver development than I did. In the end I was able to contribute the driver back to the FBTFT project.
(There’s something pretty funny about running startx and having Raspbian try like hell to fit a modern GUI into a 96×64 postage stamp.)
This got me as far as being able to use the displays as independent framebuffer devices. The next challenge was to play a stereoscopic video to them. These videos tend to be encoded side-by-side or above/below, i.e. the contents for each display are combined into one video either beside or on top of one another. My first thought was to run X in multiheaded mode, with a single desktop spanning across both displays — quick, easy, configurable. Unfortunately, also seemingly impossible. The X framebuffer driver appears not to support Xinerama.
The only way I could think of getting this working was to write another driver that combined the two displays into a single framebuffer device. This ended up forcing me to learn more about SPI.
SPI is a serial bus. The Raspberry Pi has two SPI chip select lines, and I was using one for each display. In order to drive two displays painlessly from a single driver, I had to tell SPI not to use any chip select functionality, and then control the chip select lines manually as normal GPIO pins.
This turned out not to be too difficult — but the slow compile cycles on the Raspberry Pi made me think carefully before trying something out. I’ll post the driver on my github account since I don’t think it’ll be useful for the fbtft official distribution.
The Optical Drive
The View-Master itself is surprisingly small — meaning cramming an optical drive into it was a challenge. For parts, I wanted something fairly cheap and unloved, since I expected to destroy a few drives in the process; also, something with coarse tolerances and lower speeds seemed wise. So I decided to work with laptop CD-ROM drives (no DVD, no burning capabilities). I picked up an external USB CD-ROM on ebay for pennies. This includes a chassis (chuck it), a USB to ATAPI adapter (keep it), and a CD-ROM drive (keep it).
Luckily a laptop optical drive is pretty miniaturized — it’s mostly just plastic and metal bits of chassis, and the drive mechanism itself is pretty small. With all the extras removed, it fits in the View-Master such that the spindle can be just a little off-centre and the corner of the mechanism will be more or less flush with the outside edge.
There’s no way a full-sized CD will fit in this thing, though. And it wouldn’t look right, either, being much larger than a View-Master reel. Luckily there’s the 80mm Mini-CD standard. These are just small enough to fit in the View-Master with the drive installed, and look like decent tributes to the old View-Master reels they’re mimicking here.

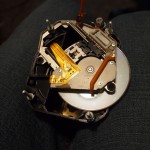


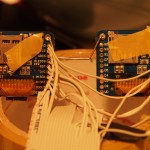
These pictures should give some impression of the lengths (so to speak) I had to go to get everything to fit. I trimmed the corners off circuit boards with sidecutters; I removed sockets; I destroyed cables to get rid of all that strain relief nonsense and get a tight 90-degree bend when necessary.
Assembly
My friend Ingo drilled out the rivets holding the View-Master together — he has a drill press and much steadier hands than I do.
I opted to build the thing in layers, starting with displays, then a barrier, then the drive, then the rear of the View-Master itself as a barrier, then the Raspberry Pi and CD-ROM controller in the battery and bulb compartment. For the barrier between the displays and drive, I cut up the lid of a jumbo yogurt container. Hey, stop looking at me that way.
Given that I’m dealing with a bona fide antique, I felt it was important to keep the external parts of the chassis unmodified if at all possible. I had to dremel out some internal structures, but it should be possible to reassemble the thing back into a working View-Master without too much trouble. And the outside is so clean and smooth, I didn’t want to start chucking ugly stuff onto it. These considerations made the cable run from the drive and displays to the brains of the thing tricky — but as fate would have it, there are two holes just big enough for the job: the ones that used to let light in. No drilling necessary.
In the end, assembly was extremely fiddly. I ended up using paperclips a lot — to attach the two displays together a fixed distance apart, but in a way that could be fine-tuned by bending the wire. and to build a couple of pieces of internal structure to hold the two circuit boards close together, but not so close that the smoke came out.
(At one stage my enthusiasm got the best of me while cramming the final pieces together and I tore the ribbon cable to the CD-ROM. At 7pm on a Tuesday there was nowhere to get a replacement, but I’ll be damned if I’ll stop so close to being finished, so for now I’ve soldered the severed wires back together. It’s pretty fragile and I expect I’ll have to replace the CD-ROM before long. Ribbon cable repair is a horrible punishment I don’t wish on anyone.)


Software
Only a few tweaks were required to get the software behaving as I wanted. I edited /etc/fstab to get the CD-ROM to mount on boot; I made the SD partitions mount read-only so I could pull the power to turn it off without worrying about filesystem corruption; and I added a cron entry to get the video to actually play on @reboot. (Hey, this is much more convenient than monkeying around with init.d scripts.)
Overall
If you had a View-Master as a kid, you’ve probably forgotten all the cross-eyed squinting that’s involved. It’s pretty far from a modern 3D experience. And this one is the same — in addition to the squinting, the displays are pretty low resolution.
HOWEVER — it’s a video player that takes optical disks built into an antique View-Master. It works. You snap a disc onto the spindle, plug in the power, and it PLAYS A 3D MOVIE. This started out as a cheap gag for me — wouldn’t-it-be-funny-if-someone-made-this — and now it exists. This makes me indescribably happy.
I have a couple of things to finish: trimming the excess lengths of machine screw; tweaking the display alignment; improving light-proofing; making a nicer bracket to clamp the two units together; making a cap for the top with a proper power socket. Improving the frame rate. But those are details.


Categorized as: Uncategorized
Oculus Thrift.
Now if only you can integrate a GameCube in there… I believe those uses tiny mini-DVD disks.
Heh, I tried to think of a clever name for this but couldn’t. Oculus Thrift is a stroke of genius.
[…] he’s been working on. Converting an antique View-Master from the early 50′s into a modern 3D video player, capable of reading […]
Awesome!! Any chance I could get you to write a full tutorial for this for Instructables? I’ll give you a Pro user code and they have both a Rasp Pi and a hardware hacking contest going on right now with some awesome prizes- something this would be perfect for!
http://www.instructables.com/contest/hardwarehacking/?show=PRIZES
Thanks for the invite — I’ll consider it, but I fear this isn’t repeatable enough for an Instructable; the chances of someone getting the same Viewmaster unit are very low, and same goes for the CD-ROM drive, USB to ATAPI adapter, etc, which makes a lot of the specifics variable.
[…] he’s been working on. Converting an antique View-Master from the early 50′s into a modern 3D video player, capable of reading […]
[…] he’s been working on. Converting an antique View-Master from the early 50′s into a modern 3D video player, capable of reading […]
As somebody who has stuck small displays into an old retro viewer myself I appreciate every bit of this hack!
I LOVE the 3D frambuffer hack for the displays. I would like to do this myself but don’t know enough about coding drivers 🙁
Could you do this with 2 of those Nokia style SPI screens? They do 128×128 and would be slightly better for video viewing.
Mine was built into a Tomytronic 3D handheld game and used a PIC micro instead of a Pi.
Pyrofer, is there already kernel driver support for that display? If so, you’re off to the races, and modifying it to support two stereoscopic displays wouldn’t be a huge piece of work. If there’s not a driver yet, and if you can find a datasheet, it’s still not so bad since you have FBTFT to rely on for the scaffolding.
If you’re interested in a better write-up of converting a normal driver to stereoscopic, I can whip something up.
I would like to see this write-up 🙂
Sure, will do. Pop the blog into your feed reader and I’ll try to tackle it in the next week or so. [Done: see the blog for the new post.]
Heh, nice idea. I did wonder if I could use the same method to resurrect my (sadly demised) widescreen DVD player with a bad drive, the onboard electronics work but the laser is dead.
I have kept the optical deck and in theory if the eye input is fed a valid locked signal it should decode correctly if the timings etc match up.
The rotation sensor works by detecting the stream so in theory if a third party decoder was installed it could play Bluray.in 720P with a frame doubler and 3D active glasses to get 1080P.
Next challenge: figure out how/where to get a BRD reader which fits in place of the defunct DVD/CD mech
[…] View-Master media player via HaD. […]
[…] ที่มา http://cassettepunk.com/blog/2013/11/12/view-master-video-player-hacking/ […]
[…] few years ago we saw a View-Master that was upgraded with digital picture frame displays. Alec Smecher took the classic toy to the next logical progression. He bought a very old model of the View-Master […]
There are higher res displays available, both in LCD and OLED, but those Adafruit ones are the right aspect ratio. While the idea of craming the entire gizmo into the old viewmaster is a cool retro idea, you might consider using the client-server model and reduce the function of the viewmaster to that of a remote x server. Then the player software (and media) would reside on a host PC, and would connect to the view via either Cat-5 (ethernet) or USB. That would simplify the mechanics quite a bit!
I’ll bet many of the problems I had here will be gone if I revisit the idea in a couple of years: small, hi-res displays will be ubiquitous and the computer driving it will be smaller and faster. (The poor RPi has to huff and puff to decode video in software — the mpeg decoding is totally unaccelerated. I wonder how much higher res I could drive before it was just too much for the RPi.)
The other Viewmaster hack I linked used bigger displays, and he reports that the primitive optics in the eyepieces lead to a lot of distortion around the edges. But if I had my druthers, using a 2″ display for each eye and replacing the optics entirely would be pretty slick.
[…] seiner Webseite stellt Alec seinen View-Master genauer vor. Ganz fertig ist seine Erfindung noch nicht. Ob er die […]
Absolutely brilliant project. Can’t believe you managed to cram it all in there!
[…] Read it here or watch the video below: […]