Drum Lights: Triggered Drum Illumination
January 3, 2015
Happy New Year!
I’ve just finished surviving a New Years’ show masterminded by Bobbi-Jo Moore of The Elixxxirs. Let me briefly sing her praises first: she assembled and coordinated an army of volunteers to put together a “Back To The Future” themed party and Parkinsons fundraiser for 400, including the bar, decoration, promotion, lighting, sound, DJ, and endless loads of supplies. Not to mention actually playing the show. That’s a tremendous amount of work and risk to take on. She dug deep into her circle of friends to find help and they really came through. I’m impressed. It was a great night.
Since The Elixxxirs were representing 2015 (the future!) I thought it would be fun to do something interesting with the drums: a light show triggered by playing. Many have had this idea before — see, for example, Adafruit’s entry on the subject — but so far the examples have fallen a little short of the mark.
Here’s mine:
Like the above example, I used an Arduino-based controller (a Trinket) and Neopixel LED strips. For the trigger, I used a piezoelectric sensor, which is what most drum triggers use anyway, besides being cheap and easy to work with. Each unit was built into a small plastic chassis.
-

- Schematic
-

- 1. Mounting the power jack
-

- 2. Capacitor installed
-

- 3. Pigtails on Trinket
-
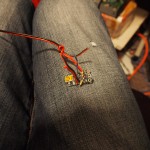
- 4. Piezo wired to Trinket
-

- 5. Unit fully assembled
Assembly was basically trivial; a bit of dead-bugging, soldering directly onto the Trinket. I’ve long wanted to jump to working with AVR chips directly, rather than using the Arduino platform, but the Trinket is so cheap and easy to use that it’s simply not worth the trouble yet.
My first prototype had a couple of potentiometers mounted to adjust characteristics of the light show, but these proved unnecessary — it works well without any adjustment. (Not being able to use the USB connection to program the chip when you’ve got potentiometers connected to those AVR pins was a bit annoying. In the future I’d use a small connector to permit quick detachment of those pins.)
This was also my first experience working with Neopixels. These are great, if not all that cheap. It almost feels like cheating; these parts are basically snap-together.
I soldered directly onto the piezo pickup, which is the most fragile part of the whole affair. I hot-glued the wires down to help decrease the stress on the solder joints. Particularly when stuck down to the bass drum skin, there’s a lot of motion going on when I’m playing the drums. (See it in slow-motion.) Working with the bare piezo keeps the mass down, but even so, there’s a noticeable damping of the cymbals in particular. I taped the piezo into the underside of each cymbal fairly close to the bell to limit this.
The set-up worked flawlessly during the New Years’ show, with a little overzealous taping to keep the power cords in, the triggers attached, etc.; that won’t be a new requirement for a drummer, who will be used to surprise mid-song cymbal stand failure.
Source code on Github.
This would be a great project even for a drummer who has very limited experience with electronics or programming. The circuit and the code are both just about as easy as they can be.
More video to come, I hope!
Categorized as: Uncategorized
Thank you. I followed your instructions and put one on my sons kick drum. It works awesome. Adafruit should be paying you. I bought the trinket and neopixel from them. I stole a piezo from a broken guitar hero
drumset. Picked up some glow in the dark drumsticks too. My son took 1st place in his talent show. You Rock!
Damon, tell your son that you two just made my week! That’s fantastic, thanks so much for letting me know.
Dear, this project (and this blog theme) in fantastic! 🙂
One question: how many piezo and led i can attach to one Trinket? I want to light up my percussion (5 cowbell and 1 bongos), so I ask you before waste money 🙂
— i’m italian and this is my english 😀 —
Hi Federico! Rather than using trinkets, consider using a single ATTiny85 chip for each of your drums. I’ve tried this and it’s pretty easy and very compact, and these chips are much cheaper than trinkets. I programmed them to use internal oscillators (8mhz) to keep the parts count small. You can program them using an Arduino.
Fantastico! 🙂 2 more question, if you can (want) reply…
– the sketch to use is always the same?
– I must use only “neopixel led”, isn’t right?
I’m not so skilled in programming, so…you know! 😀
Hi Federico! I’m glad this might be useful, so I’m happy to help.
The only thing you’ll need to change, I think, is the length of each strip. In my .ino file I have several #define constants for this (BD_LENGTH, SNARE_LENGTH, etc). Then before I flash the sketch I make sure I’m using the right constant in the constructor for the Adafruit_NeoPixel object:
Adafruit_NeoPixel strip = Adafruit_NeoPixel(HH_LENGTH, STRIP_PIN, NEO_GRB + NEO_KHZ800);
If you like, you can get rid of HH_LENGTH above and just use the number of lights in the strip instead.
This should work for anything the Neopixel library supports, but I’ve only used this one:
https://www.adafruit.com/products/1138
Cheers,
Alec
hello , i am not sure the connection of sensor.
why the source code
#define PIEZO_DIG_PIN 2 // The digital pin # for the piezo input
#define PIEZO_ANALOG_PIN 1 // The analog pin # for the piezo input
however, the schematic picture. the pin 1 did not connect anything.
if i use this sensor
http://www.dfrobot.com/wiki/index.php?title=Analog_Piezo_Disk_Vibration_Sensor_(SKU:DFR0052)
how to connect it with trinket?
thank you so much
you can email me by tsunfaihui@gmail.com
as i have other question 🙁
Hi Jeff! Digital pin 2 is the same as analog pin 1, and should be labeled “#2” on the Trinket. See e.g. the pinout diagram on the Trinket page: https://learn.adafruit.com/introducing-trinket/pinouts
Thanks a lot!!! That is useful!!!
Yesterday I successfully completed the circuit. However, I want to tune the sensorbility of the sensor. I try to change the program code that is
strip.setPixelColor(0, Wheel(n++, analogRead(PIEZO_ANALOG_PIN)/1024.0));
I change the 1024.0 to 30.0 or 1024.0 to 5000.
I find that 30.0 is more brightness than 5000 but more sensitive than 5000.
How can I keep its brightness but less sensitive?
What is the coding for tuning brightness?
Actually, I am not fully understand the coding such as what is the meaning of
“WheelPos” and “intensity”???
Thanks a lot!!
Hi Jeff,
The WheelPos is the colour (which just rotates, and doesn’t depend on the piezo sensor), and the intensity (brightness) comes from the piezo sensor.
For the intensity, you’re reading an int value from 0 to 1023 corresponding to the voltage coming in from the piezo sensor. You need to convert that to a floating-point number between 0 and 1 for the brightness to change corresponding to that value. (As you’ve noted, smaller means brighter, larger means dimmer.)
To calibrate your sensor, I’d suggest sending the value you get from analogRead to your serial monitor to get a sense of the range. Then you can adjust the 1024.0 value accordingly. (Note that the .0 is important as it tells the compiler that you want a floating point number, not an integer, as the result. Otherwise rounding will probably be a problem.)
If you want to increase the brightness but not the sensitivity, try adding a number, e.g. for the Intensity variable:
(analogRead(PIEZO_ANALOG_PIN)/512.0) + 0.5
…but of course that’ll mean the lights only go down to half-brightness, no darker than that. Other approaches could be e.g. using 0 for intensity if the value from analogRead is below a certain, and adding a baseline number above that threshold, etc.
Let me try it later. As I just wake up 😀
In hardware problem, I find that after I use the drum light device then turn it off. Wait a while, I turn on the device again, the light will turn on automatically even I do not touch the sensor. And after about 30s – 60s, the brightness will decrease and it work correctly. Is it the problem about I use a capacitor 1000uF with 16V and 1M ohm?
Sorry, I have a lot question haha.
You are so nice!
Thank you
I think something around the resistor R1 might cause a problem like that. Sorry if this is a silly question, but are you sure you’re using a capacitor for C1 and a resistor for R1?
I cannot get it to work, Using a gemma. Do I need a different pinout? Code went in as far as I can tell.
Mike, I’ve never worked with Gemmas before, but if I were debugging this I’d start by testing the piezo element (e.g. by reading from it and writing the result to the serial connection, testing by prodding it liberally), and separately test the lights by running one of the demos.
OK got it working on arduino uno, but only half of the leds are lit 30 out of 60.
Mike
ok got it , set snare in length. What are the resistor and cap for? seems to work fine without it.
Mike
During long rolls, it locks up and goes pink.
Mike, time to add that capacitor, I think 🙂
If you get a sufficient voltage sag when lots of lights are being driven, it’ll cause the processor to lose its tiny mind. If a cap doesn’t do it, make sure your power supply is rated for enough current.
I’ll try a 1 MF? I have a 4.7 MF too. I’ll try em both and see which one works. Its on a Pearl Pipe band snare so the rolls are intense. Thanks again. Nice project!
Wow. This project exceeded my expectations. Incredible, thank you so much.
One question, as I am new to addressable leds. How do I make them pulse from the center out,or ends in?
Great, Mike, this is my favourite kind of comment to get. Please post a video if you get the chance and drop a link here!
Currently the code just reads the value of every LED but the first and moves it down the chain by one…
https://github.com/asmecher/drumlights/blob/master/drumlights.ino#L37..L39
…then it sets the value of the first LED based on what the piezo transducer is reading:
https://github.com/asmecher/drumlights/blob/master/drumlights.ino#L42
To make it behave differently, just figure out where you want to drop the newest reading on the chain (the second snippet), and then tell it how to move these values on down (the first snippet).
line 37: for (int i=strip.numPixels(); i>30,i<30) {
line 42: strip.setPixelColor(30, Wheel(n++, analogRead(PIEZO_ANALOG_PIN/1024.0));
something like this?
You’ll have to tinker with this a little, I’m afraid — if I start throwing pseudocode at you I’ll probably just confuse things.
Well it looks like i’ve blown the neopixel strip. I think it may have gotten a transient voltage surge. I was powering it off the 5v output on the Uno. I ran a strand test and only the first 3 will light now.
Back to the drawing board.
Sorry to hear it, Mike! I’ve been running mine off decent-quality power bricks (about the size and shape of laptop power supplies) — I was using fairly long LED strips and wanted to be sure I wasn’t testing the supply’s limits. I’ll bet lower-power supplies are inherently crappier… maybe it’s worth spending a few extra bucks on a better supply, even if it’s overkill. (Rechargable) batteries would also be a lot safer, plus mobile.
Ok, Drummer here. Ive no clue how to do this, but wow this looks exceptional wehn compared to the others. I saw the Adafruit version but it was way too sensitive and kind of flat. Live would get repetitive for me. This circuit looks simple for a drummers mind, and I rather like the circling effect.. Ill only want to make one. For a snare will I have to adjust any code?
All you’ll have to adjust is the length of the Neopixel strip (e.g. HH_LENGTH), otherwise you should be set. Let me know if you get stuck — and likewise when you get it done!
Hey!
This looks awesome! I want to hook this up to a cigarbox ukulele and maybe see it light up when I strum. However the issue I am having is that the lights turn off when vibration is detected and are otherwise always on. Any advice?
Thanks!
Hi Nicholas! I’m afraid I can’t provide much help beyond suggesting double-checking the circuit. Make sure you corrected the string length in the source code for your particular light strip. You can also distinguish between light-related problems and piezo-related problems by trying out one of the NeoPixel test sketches. Good luck, and please consider linking to a video or something once you’re done!
Dear admin, finally I did it! It could work!! 😀
Now I will try with an ATTiny85 and other led strip (similar to neopixel but cheaper)
Thanks a lot!
Great, Frederico! Did you post your project somewhere? I’d love to see it.
Your idea is Great!!
I have already ordered a couple of those Trinkets as i would like to try my luck.
I am totally newbie to programming so any advice of what i would need as far as software would very much be appreciated. I am the old school in electronics so Arduino stuff is not by “forte”.
Another question is if this board instead of doing the cycle pattern as we can see it in your video if it can just blink every time we hit the drum head and to be possible to adjust the on time (almost flashing every time)
thanks a lot
Thanos/Greece
Hey Thanos — the Arduino toolkit should already support Trinkets without anything extra needed. You’ll have to get yourself a little oriented e.g. on how to upload code to the Trinket but their tutorials are pretty good.
The changes you’re thinking of would be pretty easy to code up; if you want the lights to react all at once and in the same way you could actually save a little cash and just go for a plain LED strip instead of the fancy one I used.
Dear Admin,
thank you for sharing this great project with us! I`m a member of a german percussion ensemble and we`re planing a drumming lights show. So this led stuff would be fit perfectly in.
Instead of the Neopixels, I have the MeRGBLed stripe and I`m not able to upload your sketch. The Meblock library is included.
Is it worth in your opinion to go further on or get a neopixel (which is much more expensive…)
Looking forward to your answers and all the best!
Michael
Hi Michael! I’m not familiar with that product; do you have a link to a description?
Hello,
thanks for your answers!
here they are:
https://www.reichelt.de/makeblock-led-rgb-strip-1-m-mb-rgb-led-1m-p202123.html?&trstct=pos_1&nbc=1
I realized, that these are the Adadruit WS2812B. So I used the Adafruit library. It`s working so far. Thank you! Except of the fact , the color doesn`t go through the strip, but turns on and of all ledsat the same time in case of trinket contact. But this is exactly what we want.
The only thing we are looking for, is to set the color to white. Is that possible?
I don`t know why, but to load the code on the trinket, we had to take an additional code:
#include
#ifdef __AVR__
#include // Required for 16 MHz Adafruit Trinket
#endif
and this code in the void setup:
#if defined(__AVR_ATtiny85__) && (F_CPU == 16000000)
clock_prescale_set(clock_div_1);
#endif
With best regards
Michael
Hi Michael!
Off the top of my head, to set the colour to grayscale, you’d just need to edit the Wheel function to return:
return strip.Color(255 * intensity, 255 * intensity, 255 * intensity);i.e. the same value for red, green, and blue components.
Hope that works…
Hello,
thank you very, very much for your help! It works, as you have predicted!
As soon as our project starts, I will send you a video, if you are interested.
All the best!
Michael