DIY RFID Music Box
September 30, 2015
Another project, hot on the heels of the PCsr — and this one might actually be practical.
Stereos were a huge part of my youth. I bought them in garage sales and at thrift stores, the cheaper the better — department-store brands with commodity modules glued into toxic particle board. 8-track, cassette, AM/FM radio, and the worst turntables available to humanity. But I was 10 and had paper route money; my daughter is 3 and joyfully ignorant of finances. She is, however, starting to show preferences in music. “Yellow Submarine” is her first musical awakening.
One day I’ll get her playing with tapes and other relics, but for now I wanted something she could use. I thought it would be fun to use RFID tags to take the place of physical storage media.
How it’s built
There are a few necessary components:
- The computer: I used a Raspberry Pi. That’s overkill, but they’re so cheap it’s hard to argue. (An old router that runs OpenWRT and has USB would have done just fine.)
- An RFID reader. I used an ID-12LA as it’s easy to connect directly to the Pi.
- An amplifier. I built a simple dead-bugged amp out of an LM386 chip.
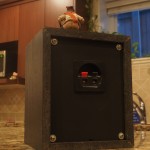
- A speaker. This also provides the chassis for the whole thing. I used a Sony center channel speaker I’ve had kicking around for years.
Building the hardware
I started by getting the Raspberry Pi talking with the RFID reader. Consider getting a breakout board with the RFID chip — but you could also solder directly to it, if you’re careful.
Hooking the RFID reader to the Pi is easy:
- VCC (reader) to 3.3v (Pi)
- D0 (reader) to UART0_RXD (Pi)
- GND and FORMAT (reader) to GND (Pi)
I also broke out the reader’s RESET pin to a GPIO on the Pi, but I didn’t end up using it for anything.
To check if it’s working, first make sure that the serial port on the Raspberry Pi is freed for your use.
Then, on the Pi…
stty -F /dev/ttyAMA0 9600 raw

cat /dev/ttyAMA0
Swipe a few RFIDs past the chip to see if it works. You’ll also get a hint of the range of these chips. Hint: it’s short. I’m amazed it’ll work at all on 3.3v.
Other than that, electronically, there’s just hooking up the Pi’s audio output through an amp to the speaker. A note: The Pi isn’t as bad as the Olimex board I recently worked with, but it does generate some audio noise in the LM386 amp. If I were doing this with pristine audio in mind, I’d probably get a cheap USB audio adapter that has an integrated amplifier and keep the wires as short as possible.
-

- RFID reader wired
-

- Dead-bugged amp
-

- Close-up dead bugging
-

- Electronics assembled
-
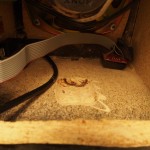
- Trench dug for RFID reader
-

- Electronics mounted
As for the chassis and mounting details: the speaker chassis was sealed so I had to cut it apart. I left a margin of the old backing present to give something to mount the new backing to. I saved the speaker terminals and mounted them to the new backing [which, incidentally, was made out of a surplus clipboard]. I used T-nuts to mount the new backing, as I’ll need to remove the backing occasionally to access the USB stick.
As I mentioned before, the range of the RFID reader is not huge. The wood of this chassis was fairly thick, so I needed to dig a trench into it to mount the RFID reader as close to the surface as possible. A Dremel sanding bit made short work of this.
-

- Music Box Front
-
- Music Box Rear
The software
This is more a matter of scripting and system administration than anything else. You’ll probably want to make your Pi read-only. You’ll also want to get it to automount USB media. There is a little bit of code, which I’ve posted here. Add the musicbox.sh script to your cron @reboot list — make sure this doesn’t happen to you like it did to me.
To prepare the USB stick with music, place .pls playlists on the stick named after the RFID serial number (the text part of the text you get when you cat /dev/ttyAMA0 as above).
End result? It speaks for itself:
[Note: Obviously I don’t let her use it with the power supply cord I demonstrated in the first video. That was too good a joke not to include. For practical use, there’s also a small mousehole cut for a proper power cable; when that’s used, the terminals on the back are totally disconnected.]
Categorized as: Uncategorized
Coming soon: wifi with a web administration interface, pausing, and a way to easily associate new RFIDs with music/actions.
This is exactly what I was looking for! Only I have an rc522 reader for the rfid cards, is it possible to use that one with your scripts? What would I have to change? (More or less a beginner)
Hi Stefan — off the top of my head, you’d definitely need to adapt https://github.com/asmecher/musicbox/blob/master/daemon.php so that it would properly pull out the tag IDs from the packets; your RFID reader sends different kinds of packets to the Pi via the serial port than the RFID reader I use. I think the rest is pretty agnostic to which chip you use.
Hi,
Thanks so much for this this is perfect I am looking to use the ID20LA using this code, do you have any pointers on using php/ sh is it possible to execute this in python or is it possible if you could go into more detail on the stages of the software. I am really struggling on what to do here. Thanks for your help
I’d suggest working with the command-line tools to make sure you can dump the data from the port before moving into working with your application — setserial, stty, and just using “cat” on the port. Once you can see data appearing, then try moving into PHP etc.